Monday, January 14, 2019

Cisco Call Manager - Create Unattended File

CUC and CUCM installation wizard has a lot of steps that require user's input. Luckily we can specify an unattended file, that has has all those settings, which you can you copy to a floppy disk device and use it during installation. Cisco supports XML for touch-less deployments 


We will use the Answer File Generator - Google Chrome is not supported.

Be extra careful and make sure you are using the correct version, else the file will not be compatible with the installation. Here it is shown 12.0.1


We can specify different products like CUCM, CUC, IM &P etc. for different versions. 


The Administrator credentials are the ones used to login to the console and the DRS and OS Administrator Web Pages. 

Next, the  security password is the one we will use in order to add a new CUCM Server to our  cluster, for example a CUCM Subscriber. 

Then we will specify the username and password of the Application Administrator that we will use to connect to the Admin Web Pages.


Information, such as OU, Location is required to create the self signed certificate. 
We will specify also the mail server (SMTP Host) 


IP address / NIC settings can also be configured as well Region and TimeZone. 


CUCM requires to configure NTP server, else the installation will fail. 
We could also add a secondary zone. 


Now we can add secondary nodes - Subscribers, where we can inherit some of the settings from the Publisher. 


Now we can press "Add Secondary Node" and the Server will be added on the list.


We can scroll up to the Secondary Node Configuration, edit the settings, for another server and press "Add Secondary Node"
This will keep both secondary nodes on the list.


On the bottom of the page, press Generate Answer File (we have actually removed the CUCM-SUB-MOH).

We can see three files. The one with the name of the Server will contains Server settings, for that specific VM, while the Cluster one, contains information about the whole cluster. 


For the Main Server (CUCM-PUB) we will press Download File and another Browser Window opens (shown on the right). To get the XML file we have to press Ctl+U, where we get the output on the right. 


We will save this file as platformConfig.xml. You have to be sure that there is no typo and the correct file extension has been selected. 


We have to do the same for the  Cluster Settings. The file has to be saved as clusterConfig.xml 


The Cluster file shows simply that CUCM-PUB with IP Address 10.10.10.101 is a CUCM "Node Role = 1" and also is a Publisher "Node Usage = 0" 
On the same file, if we expand the Subscriber, we can see that CUCM-SUB is another server in the cluster "Node Role = 1" , which is not a Publisher "Node Usage = 1" 


Now we need to create a floppy disk, and add the selected files (2 for each Server Installation). We will use WinImage


The application requires registration


We will create new Image and specify Format 1.44MB


Then we can go to Image > Inject and start adding files. 


We will add the clusterConfig.xml and platformConfig.xml 


 We will save the file as .flp


We can then go the VM Settings and mount that floppy disk.
We will add a Floppy Controller.


Then press the Add Floppy Icon, select Choose Disk and select the .flp file we have created. 


Saturday, January 12, 2019

Cisco Call Manager (CUCM) - Requirements and OVA

As we mentioned on a previous post Cisco Applications have strict hardware and software requirements. Installing any application on an unsupported system, it is more likely to make the whole system unstable and probably increase support requests to Cisco. 

That is great for a Business Environment where we want to make sure that our Applications run without issues. On a home lab, we just want to test things and see how they actually work. Cisco Application have soft and hard system requirements - that is my term.  

The table below shows the platform requirements for CUCM 11.5. As you can see only Xeon processors are supported, but the installation wizard will not check the processor requirements. Cisco Engineers will actually do if you raise a case with them, but we won't be bother with that on our home lab. I would call those soft, since we do not have to do any changes on our actual system or OS Disk. 


But on the other hand there are requirements, such as RAM, Disk, CPU, Virtualisation Software that will actually interrupt the installation.

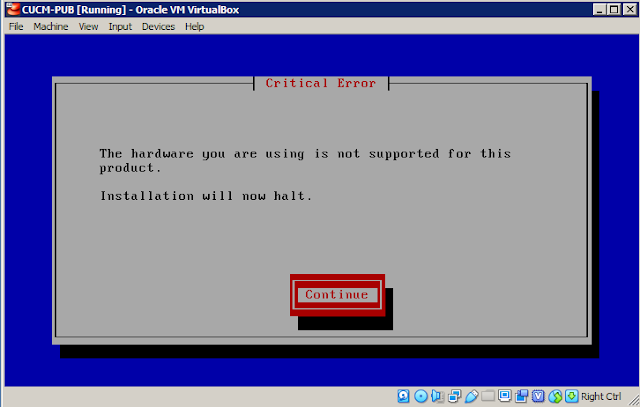
This is what we get when we install Cisco Call Manager (CUCM) on Oracle Virtual Box. We can bypass that error, by using the instruction on the previous post


What we have actually done there, is to set VirtualBox in order to "meet" VMWare requirements. Now the OS Disk thinks that we are using a VMWare Hypervisor.

The other "hard" requirements can be also found on the OVA file Cisco provide us, as we saw on the table earlier. 

Note: You can get more information about OVA files on a previous post 


We will use version 11.5 on this example. We will go to Cisco Software Downloads under Unified Communications, then Call Control (where the CUCM - Call Manager resides) and select the version we are interested 

As you can see there is no ISO file for Call Manager installation, but you can get the OVA template.


As on the requirement table you can have different installation modes based on your needs. The more supported users, the more the resources needed. 


We can also see that CUCM 11.x uses Red Hat 6 Linux Distro


So now that we know the requirements we can either meet them if possible using the correct amount of RAM/ CPU etc, else we can modify the OS Disk as shown on a previous post


Friday, January 11, 2019

Windows Host - Disk Cleanup Utilities (TreeSize)


On a previous post we can see that by using VM clones we can dramatically decrease the disk space use and time creating a new VM. 

But when we build numerous labs, we tend to keep things untidy. We probably throw ISO and installation files here and there. If you have SSDs with 500GB or more then maybe you won't notice very soon, but I used to have a 256GB SSD and I was constantly running low on disk space. 

A great tool to analyse your Disk usage is TreeSize. There is a freeware version that has all the tools needed for your home use.  

The installation is very simple. To analyse the Disk we should use Administrator privileges. 


Here we can see for example that I have almost 30GB on my personal folder and 25GB on Desktop, which I should remove.


Another useful conclusion is that the C:\ drive has two large files pagefile.sys and hiberfile.sys. 


The HDD is used when no RAM is available on our system, through the paging file. 
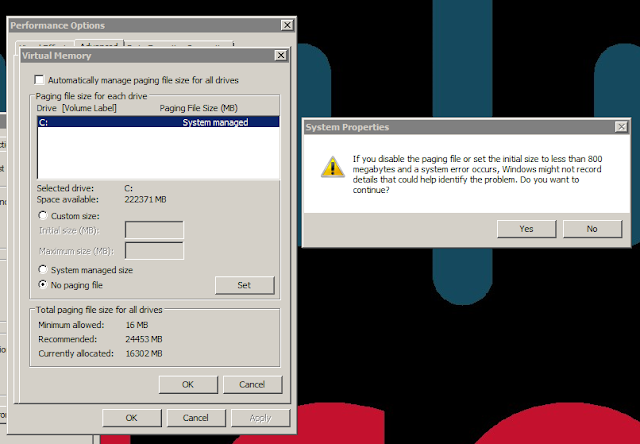
So, paging is something that can prevent our system from crashing, but actually when active, it just slows things down. I will just keep that file as small as possible. You can change the Settings by going to System Properties > Advanced > Performance > Settings


If we disable the paging file we will get a self explanatory warning from Windows.


So actually we will keep it down to 1GB. Press Set and then OK to apply changes. A reboot is also required. 


We can disable hibernate using the command below 

powercfg /hibernate off


We can see that now we have almost 30GB more available on our SSD


Thursday, January 10, 2019

Cisco Call Manager (CUCM) on Virtual Box - VirtualBox XML File

Cisco supports only VMWare ESXi virtualisation which makes sense! 

Old versions of Call Manager (CUCM) were running on Windows Servers. The administrators could easily install on top, other applications, server roles etc., which made the Call Manager unstable and of course increasing support requests to Cisco. 

Since CUCM 5.0 Cisco decided to move to Linux Red Hat. The more interesting thing is that they bundled together the OS and the Application, so you cannot easily access the native Red Hat OS, and of course if you do, Cisco will not support your Server. So what we are getting now is a light CLI and a rich Web GUI. So you don't have to know how to use Linux in order to administer Cisco Applications.

Cisco also did something similar with the hardware. Cisco Applications can run on specific servers that meet hardware requirements. After a few CUCM releases, Cisco started supporting virtualisation and as with software, we have to meet all theh ardware  requirements to be able to have Cisco Applications on Business Environments.

Below you can see the table of the requirements for the latest CUCM Application (January 2019). We can see that only VMWare ESXi is supported and also only specific hardware models. The table shows Cisco appliances, but on the far right column you can see that third party hardware is also supported, as long as this hardware is actually supported by VMWare


So what if we try to install Cisco Applications on our home lab using Oracle VirtualBox.
This is what we get:


Actually we can trick the installation and tell it that we are using a VMware Virtual Platform. Let's do that!

Make sure that the Oracle VirtualBox application is not running, else the changes will not load and also will be discarded next time we run VirtualBox.

Go to C:\Users\<User>\.VirtualBox

We will update the  VirtualBox.xml file, but before that


 We will create a backup of that XML File.


We will add the code below

<ExtraDataItem value="Phoenix Technologies LTD" name="VBoxInternal/Devices/pcbios/0/Config/DmiBIOSVendor"/>
<ExtraDataItem value="6 " name="VBoxInternal/Devices/pcbios/0/Config/DmiBIOSVersion"/>
<ExtraDataItem value="VMware Virtual Platform" name="VBoxInternal/Devices/pcbios/0/Config/DmiSystemProduct"/>
<ExtraDataItem value="VMware" name="VBoxInternal/Devices/pcbios/0/Config/DmiSystemVendor"/>

Wednesday, January 9, 2019

Cisco Call Manager (CUCM) and Unity Connection (CUC) - Create Bootable ISO

The ISO Disks we get from Cisco are not bootable. In this example we will use the  UCSInstall_UCOS_11.5.1.13901-3.sgn.iso.

PowerISO and UltraISO are both great tools that you can create bootable ISOs, but they come with a cost.  

In our case we will only use the 7zip for extracting the ISO and cdrtfe to burn our ISO Image. 

We will also need the isolinux folder from another Cisco Bootable ISO

Extract the ISO files to a new folder using 7zip and navigate to Cisco\install\conf


Navigate to Cisco\install\conf and open the callmanager_product.conf file using Notepad++


The CUCM Installation validates the Hardware available on our System and specific settings are required to pass the validation. For example trying to install CUCM/CUC in Oracle VirtualBox will fail by default.   


On a real life scenario we must use OVA Template to create our VM. The OVA file will ensure the correct settings (RAM, CPU, Disk etc.). 

If we don't follow those strict settings, then it is possible that Cisco won't be able to provide support to our system when we open a TAC Case, until we adjust those settings. 


In our lab environment, we can under-provision our system, in order to save some of our lab resources. Typically, you will get this error when you try to install the OS on a non-supported system.

There are different rules for different application, for example in the file there is also the CUC. Below you can see the CUCM models supported.  


VAL means that it can pass validation, while NOT fail. We will change both NOT that are on the MODEL column to VAL and the MAX MEMORY to * (which means any)

In the first example, we can see that if the maximum RAM is less than 2047 then the installation will fail. 

TYPE   MODEL   CLOCK   MIN/MAX MEM   MIN/MAX DISK1   MIN/MAX DISK2   COUNT 
NOT,   VMware,     *,      *, 2047,      *,     *,      *,    *,      *
VAL,        *,     *,      *,    *,      *,     *,      *,    *,      *

For Cisco Unity Connection (CUC) we have more restrictions 

VAL,   VMware,     *,   8191,    *,    290,   510,    290,  510,      7
VAL,   VMware,     *,   6143,    *,    140,   510,    140,  510,      4
VAL,   VMware,     *,   6143,    *,    190,   510,      *,    0,      2
VAL,   VMware,     *,   4095,    *,    150,   510,      *,    0,      2
VAL,   VMware,     *,   4095,    *,    150,   510,      *,    0,      1
VAL,   VMware,     *,   2559,    *,     90,   510,      *,    0,      1
NOT,   VMware,     *,      *,    *,      *,     *,      *,    *,      *

 Now replace the isolinux to the Main folder 


We will open the cdrtfe and select options. 

We will specify the same of the new bootable ISO Image Bootable_UCSInstall_UCOS_11.5.1.13901-3.sgn.iso.
and also specify do not burn to Disk and press OK. 


Then go to Filesystem and enable "create boot disk". Select No disc emulation. The boot image is the isolinux.bin on the \isolinux disk we copied earlier to the main extracted ISO. 


We will copy or drag and drop all the files of the Extracted ISO to under the Blank Disk and then press Start to burn the ISO. 


We are good to go


Okta Workflows - Send Customised Email

Simiar to the previous flows, where we sent a Slack message to users assigned to a new app, we can send a Welcome Email message. This mess...