My preferable setup is to bridge the Laptop Ethernet NIC with all the VMs in order to separate my Home Network with my Lab one. My VMs won't have a direct access to the Internet. In a typical real-life small office network, you will have a switch that connects all your devices and a Router that is connected with your ISP and routers the internet traffic.
In this case, the Wireless Network is our path to the internet, so we will consider it as our ISP and the Ethernet will be considered our Internal Network (and where we will place all our VMs). The gateway that connects those two different networks is a VM with two interfaces, one on the Ethernet (internal) and one on the Wireless (internet). The different is that normally the ISPs would provide you with a public IP Address, while in our case the "outside" network will be on a private range "192.168.0.0/24). But we can still use different technologies like NAT, ACLs etc.

We will choose VyOS, formerly known as Vyatta. Vyatta was acquired by Brocade and later by AT&T and is not an open source OS any more. VyOS, a Debian (Linux) network Operating System and is based on the latest "public" version of Vyatta, so it is free to use.
In future for testing purposes, we can replace that VM (by simply saving its state) and add setup Device , a Cisco CSR 1000V, Cisco ASA, Palo Alto etc. Once we finish our test, we can resume again our Main Gateway.
You can download the "latest" public version (6.5) of Vyatta realeased by them (2012-11-20 from archive.os website
For VyOS, we have the option to download an ISO (Rolling Release or Stable Release) and build our VM as we did with the Windows machine, or we can download an OVA/OVA File (VyOS on VMWare) that can simplify our lives.
I had some issues with the OVA file on VIrtualBox, so I re-wrote this post using the ISO Stable Image.


Adapter 2: Enable it, and Bridge it with the Ethernet NIC.


The installation will create a partition. We will press enter and select the default option - Auto.

We will install the OS on the main partition, sda. We can simply press Enter

We are warned that any data will be destroyed on the disk, but our Disk was blank, so we don't have to worry.

We will use all the available partition for our OS - default option.

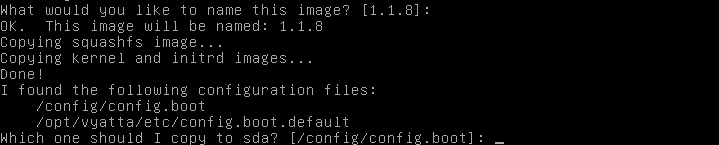
After that we can set the hostname , default 1.1.8

The configuration files will be linked to /config/config.boot
Finally we can set a password for the vyos user.


Installation was successful. We will now remove the Optical Disk, in order the OS to boot from our Disk.


In this case, the Wireless Network is our path to the internet, so we will consider it as our ISP and the Ethernet will be considered our Internal Network (and where we will place all our VMs). The gateway that connects those two different networks is a VM with two interfaces, one on the Ethernet (internal) and one on the Wireless (internet). The different is that normally the ISPs would provide you with a public IP Address, while in our case the "outside" network will be on a private range "192.168.0.0/24). But we can still use different technologies like NAT, ACLs etc.

We will choose VyOS, formerly known as Vyatta. Vyatta was acquired by Brocade and later by AT&T and is not an open source OS any more. VyOS, a Debian (Linux) network Operating System and is based on the latest "public" version of Vyatta, so it is free to use.
In future for testing purposes, we can replace that VM (by simply saving its state) and add setup Device , a Cisco CSR 1000V, Cisco ASA, Palo Alto etc. Once we finish our test, we can resume again our Main Gateway.
You can download the "latest" public version (6.5) of Vyatta realeased by them (2012-11-20 from archive.os website
For VyOS, we have the option to download an ISO (Rolling Release or Stable Release) and build our VM as we did with the Windows machine,
I had some issues with the OVA file on VIrtualBox, so I re-wrote this post using the ISO Stable Image.

On VirtualBox's main page we will press the "New" Icon to create a new VM

We wil specify the name of the VM, the location and the Type/Version would be Linux/Debian.
We will reduce the RAM size from default 1024MB to 512MB. We can expand at any time if needed.
and follow the wizard as in the Windows setup
Before we power up the VM, we will change the Networking settings.Go to Settings...

Adapter 1: Bridged with Wireless NIC
Adapter 2: Enable it, and Bridge it with the Ethernet NIC.
We also want to add the ISO that contains the OS. Under Storage find the Optical Drive and mount the Virtual Optical Disk File. File Name: vyos-1.1.8-amd64.iso

Now we can power on (Start) and configure our Internal Router
The OS will be loaded from the ISO (Virtual Disk). The start screen suggest us to start the installation using the install image command
The default login / password is vyos/vyos
We can press [Enter] or type Yes to continue, since Yes is the default Option.
The installation will create a partition. We will press enter and select the default option - Auto.
We will install the OS on the main partition, sda. We can simply press Enter
We are warned that any data will be destroyed on the disk, but our Disk was blank, so we don't have to worry.
We will use all the available partition for our OS - default option.
After that we can set the hostname , default 1.1.8
The configuration files will be linked to /config/config.boot
Finally we can set a password for the vyos user.
Installation was successful. We will now remove the Optical Disk, in order the OS to boot from our Disk.

After the reboot, the OS loads through the HDD.