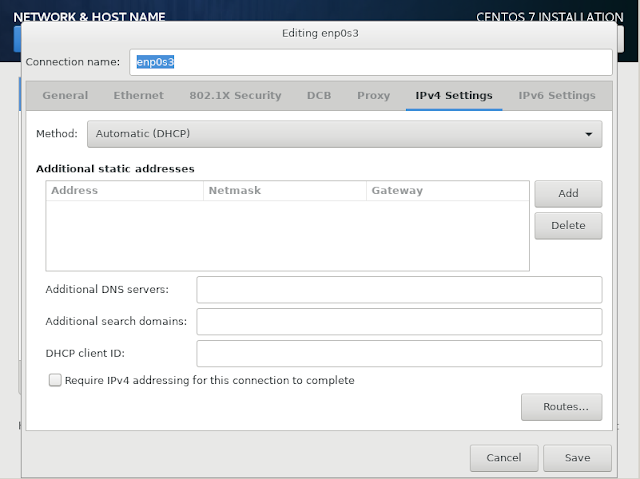
During CentOS installation demonstration, we set the Server to get a DHCP Address. Normally Servers have a static IP Address that doesn't change, so other applications can easily communicate.
We will provide two examples, where we can setup a static IP Address during and after installation.
During the setup we can go to Network & Host Name and then press Configure...
On the Ethernet TAB we can change the connection name, speed, duplex, but in order to change the IPv4 Address, we have to go to IPv4 Settings.
There we can simply press Add and set the address / mask and default gateway.
Our Server will use 10.10.10.202/24 address with 10.10.10.254 mask.
We can save our changes and then go back and enable the interface.
After installation, we can change the IP Address, using the Network Manager tool.
[root@CentOS /]# nmtui
We will select Edit a connection
We will specify which connection we are changing - here we have only one NIC.
We will change the IPv4 configuration to manual.
And specify the IPv4 settings as before - the GUI looks very similar with the OS installation one.
We can press ok to apply our changes.
We will provide two examples, where we can setup a static IP Address during and after installation.
During the setup we can go to Network & Host Name and then press Configure...
On the Ethernet TAB we can change the connection name, speed, duplex, but in order to change the IPv4 Address, we have to go to IPv4 Settings.
There we can simply press Add and set the address / mask and default gateway.
Our Server will use 10.10.10.202/24 address with 10.10.10.254 mask.
We can save our changes and then go back and enable the interface.
After installation, we can change the IP Address, using the Network Manager tool.
[root@CentOS /]# nmtui
We will specify which connection we are changing - here we have only one NIC.
We will change the IPv4 configuration to manual.
And specify the IPv4 settings as before - the GUI looks very similar with the OS installation one.
We can press ok to apply our changes.


No comments:
Post a Comment