Sunday, December 30, 2018

Troubleshooting - VyOS - Failed to Start VM - VirtualBox

I exported the VyOS Application from the (VMWare) OVA Template provided on their Website
The installation was successful, I was able to login to the console and run the basic commands. The problem was that when I was putting the VM on pause state , I was not able to Start it again. 


Failed to open a session for the virtual machine VyOS-1.1.8.

Failed to load unit 'lsilogicscsi' (VERR_SSM_LOADED_TOO_LITTLE).

Result Code: E_FAIL (0x80004005)
Component: ConsoleWrap
Interface: IConsole {872da645-4a9b-1727-bee2-5585105b9eed}

I believe this was because I used the OVA Template that was provided by VyOS, instead of the ISO image. The OVA Template was optimised for a VMWare machine and I am using VirtualBox.

Let's see what the OVA file contains. We will open the file with 7zip 


The zip file contains a Disk (*.vmdk file). We will create a new VM from scratch and mount that extracted file.  

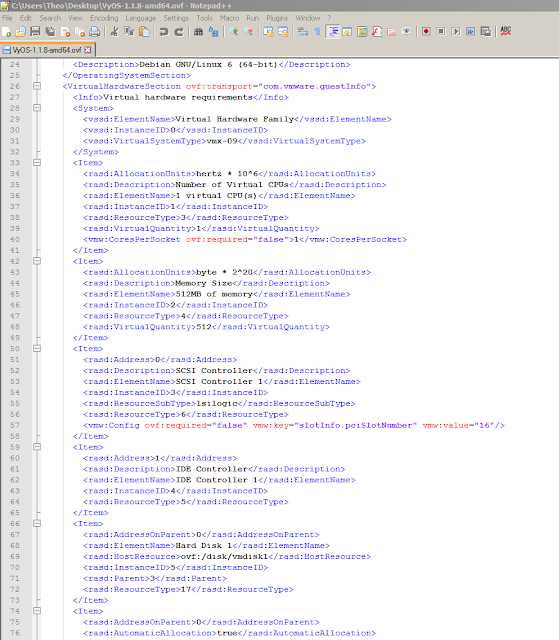
We will also extract (7zip) and then open the VyOS-1.1.8-amd64.ovf file using Notepad++ 

From there we can find all the necessary settings required, in order to create the VM, for example x1 vCPU, 512MB RAM etc.  


OS = Debian x64

 <OperatingSystemSection ovf:id="96" ovf:version="6" vmw:osType="debian6_64Guest">
      <Info>The operating system installed</Info>
      <Description>Debian GNU/Linux 6 (64-bit)</Description>

    </OperatingSystemSection>


Select "Use an existing Virtual Disk" and add the VyOS-1.1.8-amd64-disk1.vmdk file we extracted from the OVA file earlier. After that we can press create. The VM is now ready, so we can start it. 


We can now put the VM on pause state.


Add a Virtual Router on your Lab Network (Part 1 VM Installation)

My preferable setup is to bridge the Laptop Ethernet NIC with all the VMs in order to separate my Home Network with my Lab one. My VMs won't have a direct access to the Internet. In a typical real-life small office  network, you will have a switch that connects all your devices and a Router that is connected with your ISP and routers the internet traffic. 

In this case, the Wireless Network is our path to the internet, so we will consider it as our ISP and the Ethernet will be considered our Internal Network (and where we will place all our VMs). The gateway that connects those two different networks is a VM with two interfaces, one on the Ethernet (internal) and one on the Wireless (internet). The different is that normally the ISPs would provide you with a public IP Address, while in our case the "outside" network will be on a private range "192.168.0.0/24). But we can still use different technologies like NAT, ACLs etc. 


We will choose VyOS, formerly known as Vyatta. Vyatta was acquired by Brocade and later by AT&T and is not an open source OS any more. VyOS, a Debian (Linux) network Operating System and is based on the latest "public" version of Vyatta, so it is free to use. 

In future for testing purposes, we can replace that VM (by simply saving its state) and add setup Device , a Cisco CSR 1000V, Cisco ASA, Palo Alto etc. Once we finish our test, we can resume again our Main Gateway.
You can download the "latest" public version (6.5) of Vyatta realeased by them (2012-11-20 from archive.os website

For VyOS, we have the option to download an ISO (Rolling Release or Stable Release) and build our VM as we did with the Windows machine, or we can download an OVA/OVA File (VyOS on VMWare) that can simplify our lives.

I had some issues with the OVA file on VIrtualBox, so I re-wrote this post using the ISO Stable Image. 


On VirtualBox's main page we will press the "New" Icon to create a new VM


We wil specify the name of the VM, the location and the Type/Version would be Linux/Debian.


We will reduce the RAM size from default 1024MB to 512MB. We can expand at any time if needed.


and follow the wizard as in the Windows setup


Before we power up the VM, we will change the Networking settings.Go to Settings...


Adapter 1: Bridged with Wireless NIC


Adapter 2: Enable it, and Bridge it with the Ethernet NIC.


We also want to add the ISO that contains the OS. Under Storage find the Optical Drive and mount the Virtual Optical Disk File. File Name: vyos-1.1.8-amd64.iso


Now we can power on (Start) and configure our Internal Router
The OS will be loaded from the ISO (Virtual Disk). The start screen suggest us to start the installation using the install image command

The default login / password is vyos/vyos


We can press [Enter] or type Yes to continue, since Yes is the default Option.


The installation will create a partition. We will press enter and select the default option - Auto. 


We will install the OS on the main partition, sda. We can simply press Enter


We are warned that any data will be destroyed on the disk, but our Disk was blank, so we don't have to worry. 


We will use all the available partition for our OS - default option. 


After that we can set the hostname , default 1.1.8


The configuration files will be linked to /config/config.boot


Finally we can set a password for the vyos user. 


Installation was successful. We will now remove the Optical Disk, in order the OS to boot from our Disk.


After the reboot, the OS loads through the HDD.


Create a Windows Environment - Server OS

On a previous post we have gone through the basic setup of a Windows machine. A typical Windows installation take more than 20 minutes. You don't want to to go through the same steps if you want to create a VM with the same OS. 

Normally we will use the Clone Option, where we will create an exact copy of our "parent" VM (RAM, CPU, Disk and of course the state) the same. We could have a Windows parent machine with all the preconfigured application necessary, and the clone one will inherite those settings, which means we do not have to install them again on the new machine. 

After we create the clone, changes on both the parent and clone VM do not affect each other. 


On WIndows environments, the issue with cloning is that both the parent and the cloned machine would have the same Windows SID (Secure ID), which can cause various issues on a Directory Services (DS) Environment.

To change the SID, we have to use the Windows utility Sysprep.

On this post we will go through a Windows Server installation, which is similar to the Windows client one. 

This will be our main image, and from that we will clone any new Windows Server 2008R2 machines. We will add all our Parent VMs under C:\Virtual Machines\MASTER IMAGES

I am using the naming conversion WIN%SERVER-OS%-SERVICE#, for example a Windows Server 2016 that is my main Domain Controller would be WIN2016-DC1, or a Windows 2019 utility Server could be WIN2019-UTIL2. Virtual Box doesn't have a specific Windows 2008R2 version option, so we will go with 2008.


The default RAM option is 2048MB, but we will reduce it to 1024+512 = 1536MB (1.5GB). We can adjust this value for our parent VM or for our clones ones at any time.


As you can see the steps below are similar with the Windows CLient Setup. 


 Now we can go to VM settings and make a few additional changes. This VM can be used on differet setups, so I will remove the dependancy with the Network Settings.

As have mentioned earlier, we can think the VM as a folder that contain various files. The only dependency is the HyperVisor. This means that we can take this folder and move it or copy it on another computer - that in our case has Oracle VM VirtualBox installed -  and run the same VM.


We will go to Network TAB and disable (untick) the Ethernet Adapter.


On the General Settings, we will set Shared Clipboard and Drag'n'Drop to Bidirectional. This that I normall do for every VM and I will analyze on a later post.


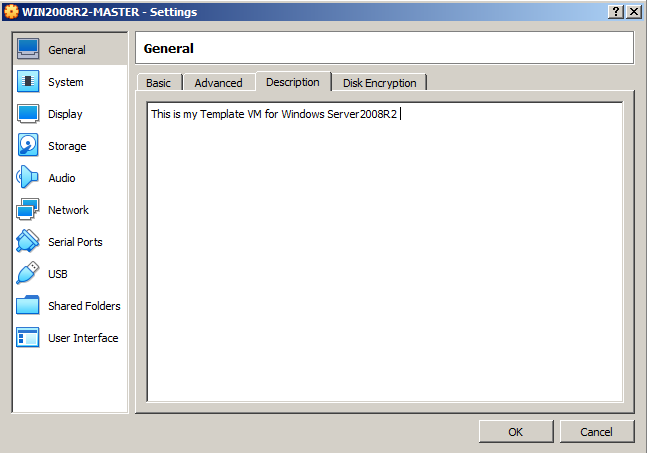
 We can create a Note under Description, keeping things more organized


On Shared Folder we will add a new Shared Folder that will be a repository for all our VMs. Instead of filling up the VMs space with files and applications we can have a location where all VMs share the same data. 

On the Shared Folder TAB, select Add new Shared Folder


Specify the Folder path and select to be Auto-mounted to the OS, to save us from that task.


You can review the settings and press OK. 


Now we can Start our VM and select the ISO required for the installation and press Start to begin the installation.


We can the OS, same as if the VM was a physical machine. After the installation we will be prompted to set a password. I try to keep my lab passwords simple and organized, so I may only use two password for any of my Labs including Cisco, VMWare, Microsoft, Linuc etc. We can use Microsoft123 for non-complex password or M1crosoft123*! for applications that require more complex (non-dictionary passwords)


Before preparing our machine, we have to add all the necessary application we want all our clone machines to inherit. We will only install the Guest OS Additions, as we have done on another post. On that post we have also shown to mount a host OS folder that will be a repository. It would be a good idea this to be on our master VM, to avoid configuring it on every host. 


We now have to "sysprep" the parent image.

 C:\Users\Administrator> cd /Windows/System32/Sysprep
 C:\Windows\System32\sysprep> sysprep


We will select Generalize and Shutdown Option: Shutdown


We can also use the command line instead

 C:\Windows\System32\sysprep> sysprep /generalize /oobe /shutdown


After the sysprep task competes the VM will turn off and we will be able to clone a new Windows Server 2008R2 machine. Before doing that we will remove the OS Disk from the reference machine, else it will be cloned to all our future cloned VMs. Go to Settings of the Reference VM, then go to Storage, find the Virtual Optical Disk, click the mount option and select Remove Disk from Virtual Drive. 


After that we can Clone our first VM. 


We will name our new VM and select the path to be installed. About the MAC Address policy we don't have to worry much since we have removed al the NICs. 


We will use linked clone. This option drammatically reduces the disk usage.  

Lets give an example to make a point. On the Windows 2008R2 VM that we have created, I have used a 30GB dynamic disk, but since the VM uses only 6.81GB, only 6.81GB disk space will be allocated to our VM. 


If we now create a Full clone, 6.81GB will be allocated for the new machine. It is not bad, but lets see how much space a Lined Clone VM consumes.


Only 2MB = 0.002GB instead of 6.81GB.


Before powering up the VM, we need to setup a NIC, based the needs of our LAB
We will go the VM settings, enable the Adapter and configure it as a Bridged Ethernet NIC. 


After that let's PowerUp our clone VM. We can see that we will go through the OOBE exprerience for our new machine.


After checking again the VM Folder size, it is now 351 MB (368,054,272 bytes), but still dramaticall low compared to 6.81GB. 

Linked Clone is my prefered method, but you have to be very careful because the cloned VM depends heavily on the parent one. If you move for any reason the parent VM to another folder then you have to link again the cloned-VM. If the parent VM is accidentally deleted then you won't be able to run the cloned VMs.

Okta Workflows - Send Customised Email

Simiar to the previous flows, where we sent a Slack message to users assigned to a new app, we can send a Welcome Email message. This mess...